Today I’m excited to give you an in-depth look at our flagship tool, the first we created at Book Brush, the incredibly versatile Custom Creator.
This tool can be used for …
- Creating your advertising memes for Facebook, Instagram, Twitter, BookBub, Pinterest
- Creating your social media banners
- Add to your Instant Mockups
- Create Swag
- Create those incredible 3D book templates from your 2D covers
- Create business and post cards
- Create Custom sizes …
SO, LET’S DIG IN
This first section will give you an idea of what the tool can do for you. The second section takes a deeper dive into the editing panel on each tool.
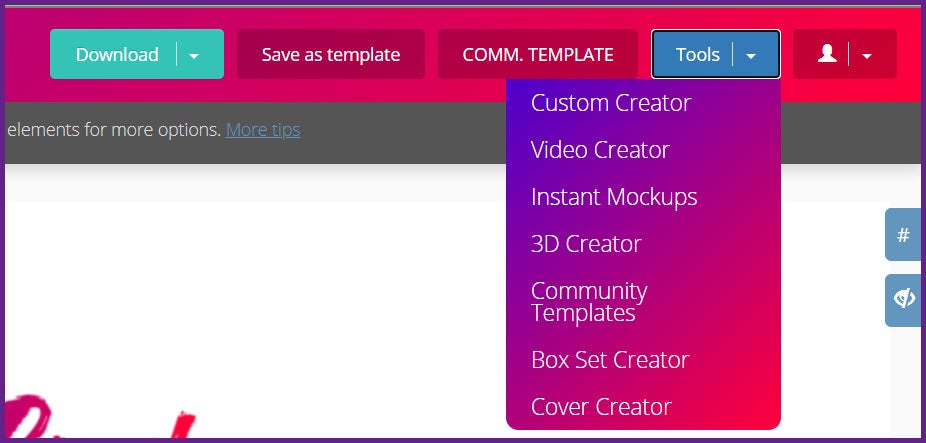
When you open Book Brush, you’ll find a quick tool drop down menu to make it fast and easy to select the tool you want to work with.
click on image to enlarge
Click Custom Creator and it will load.
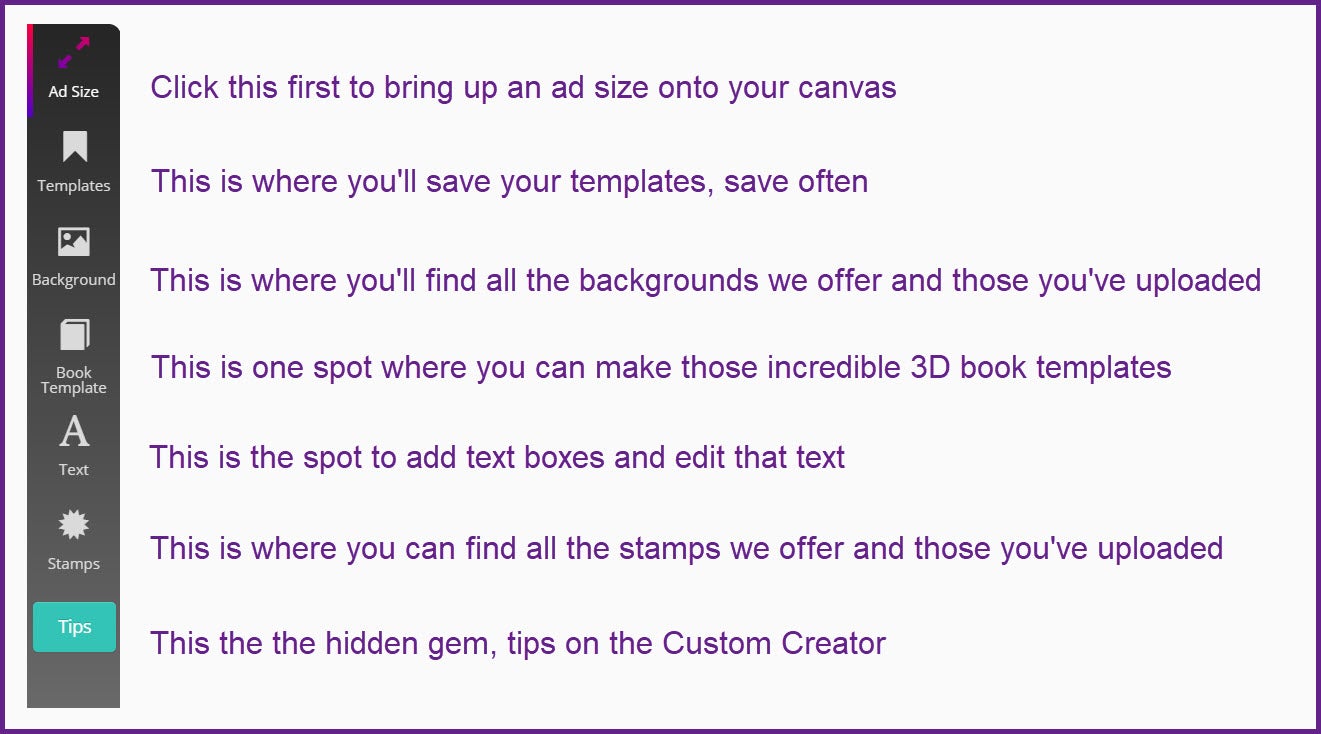
On the left column, you’ll find the icons for the tools you can use in Custom Creator
click on image to enlarge
AD SIZE
The first thing to do when you’re starting from scratch is to pick your ad size.
- Click on ad size, and the column is populated with the icons from the major social media sites as well as custom, business cards and other. Totally easy.
- Take a moment to click each one and then scroll down and see what is offered. For instance, bookmark templates for swag
TEMPLATES
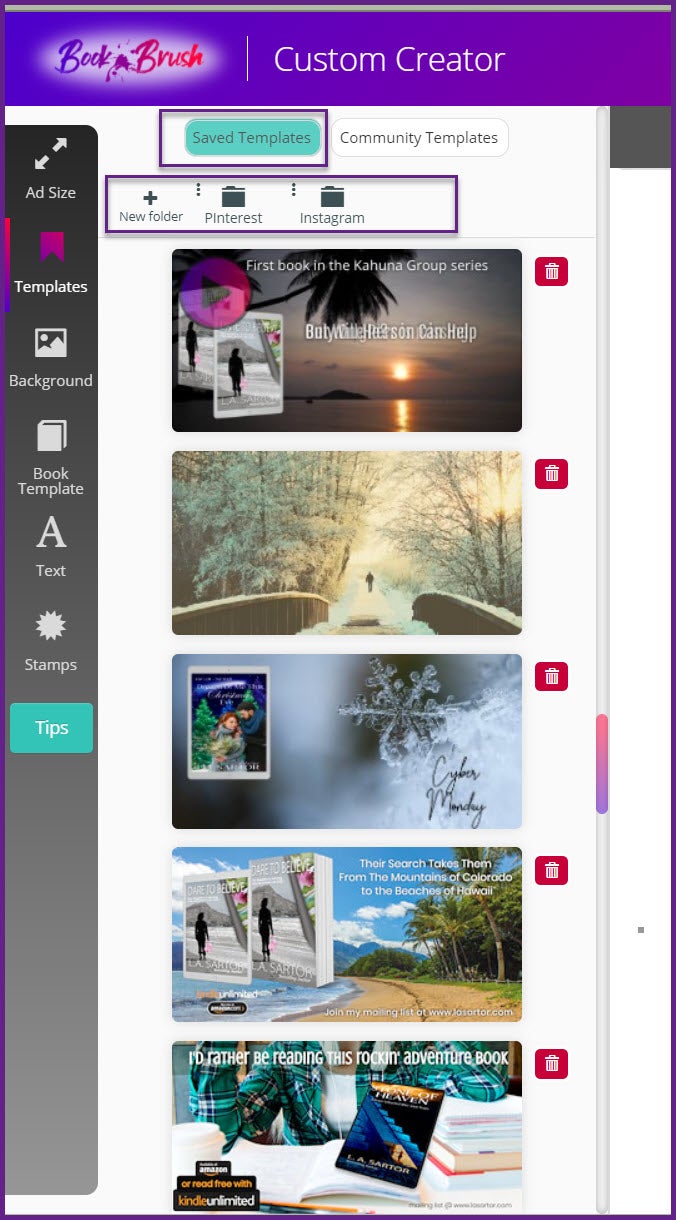
Next in the tool column is the place to save your work so it can be edited. Remember, once you download your work it is no longer editable.
Save as many templates as you can, especially those you think you’ll need again. Be sure to check what your plan allows (free 10, plus/gold 50, platinum unlimited) and if you have the space, otherwise you’ll need to download some and then delete to make room.
When you click on the template tool, you’ll see folders that you can drag a template into and then find it again easily instead of scrolling down the 100’s you’ve saved (if you’re like me).
click on image to enlarge
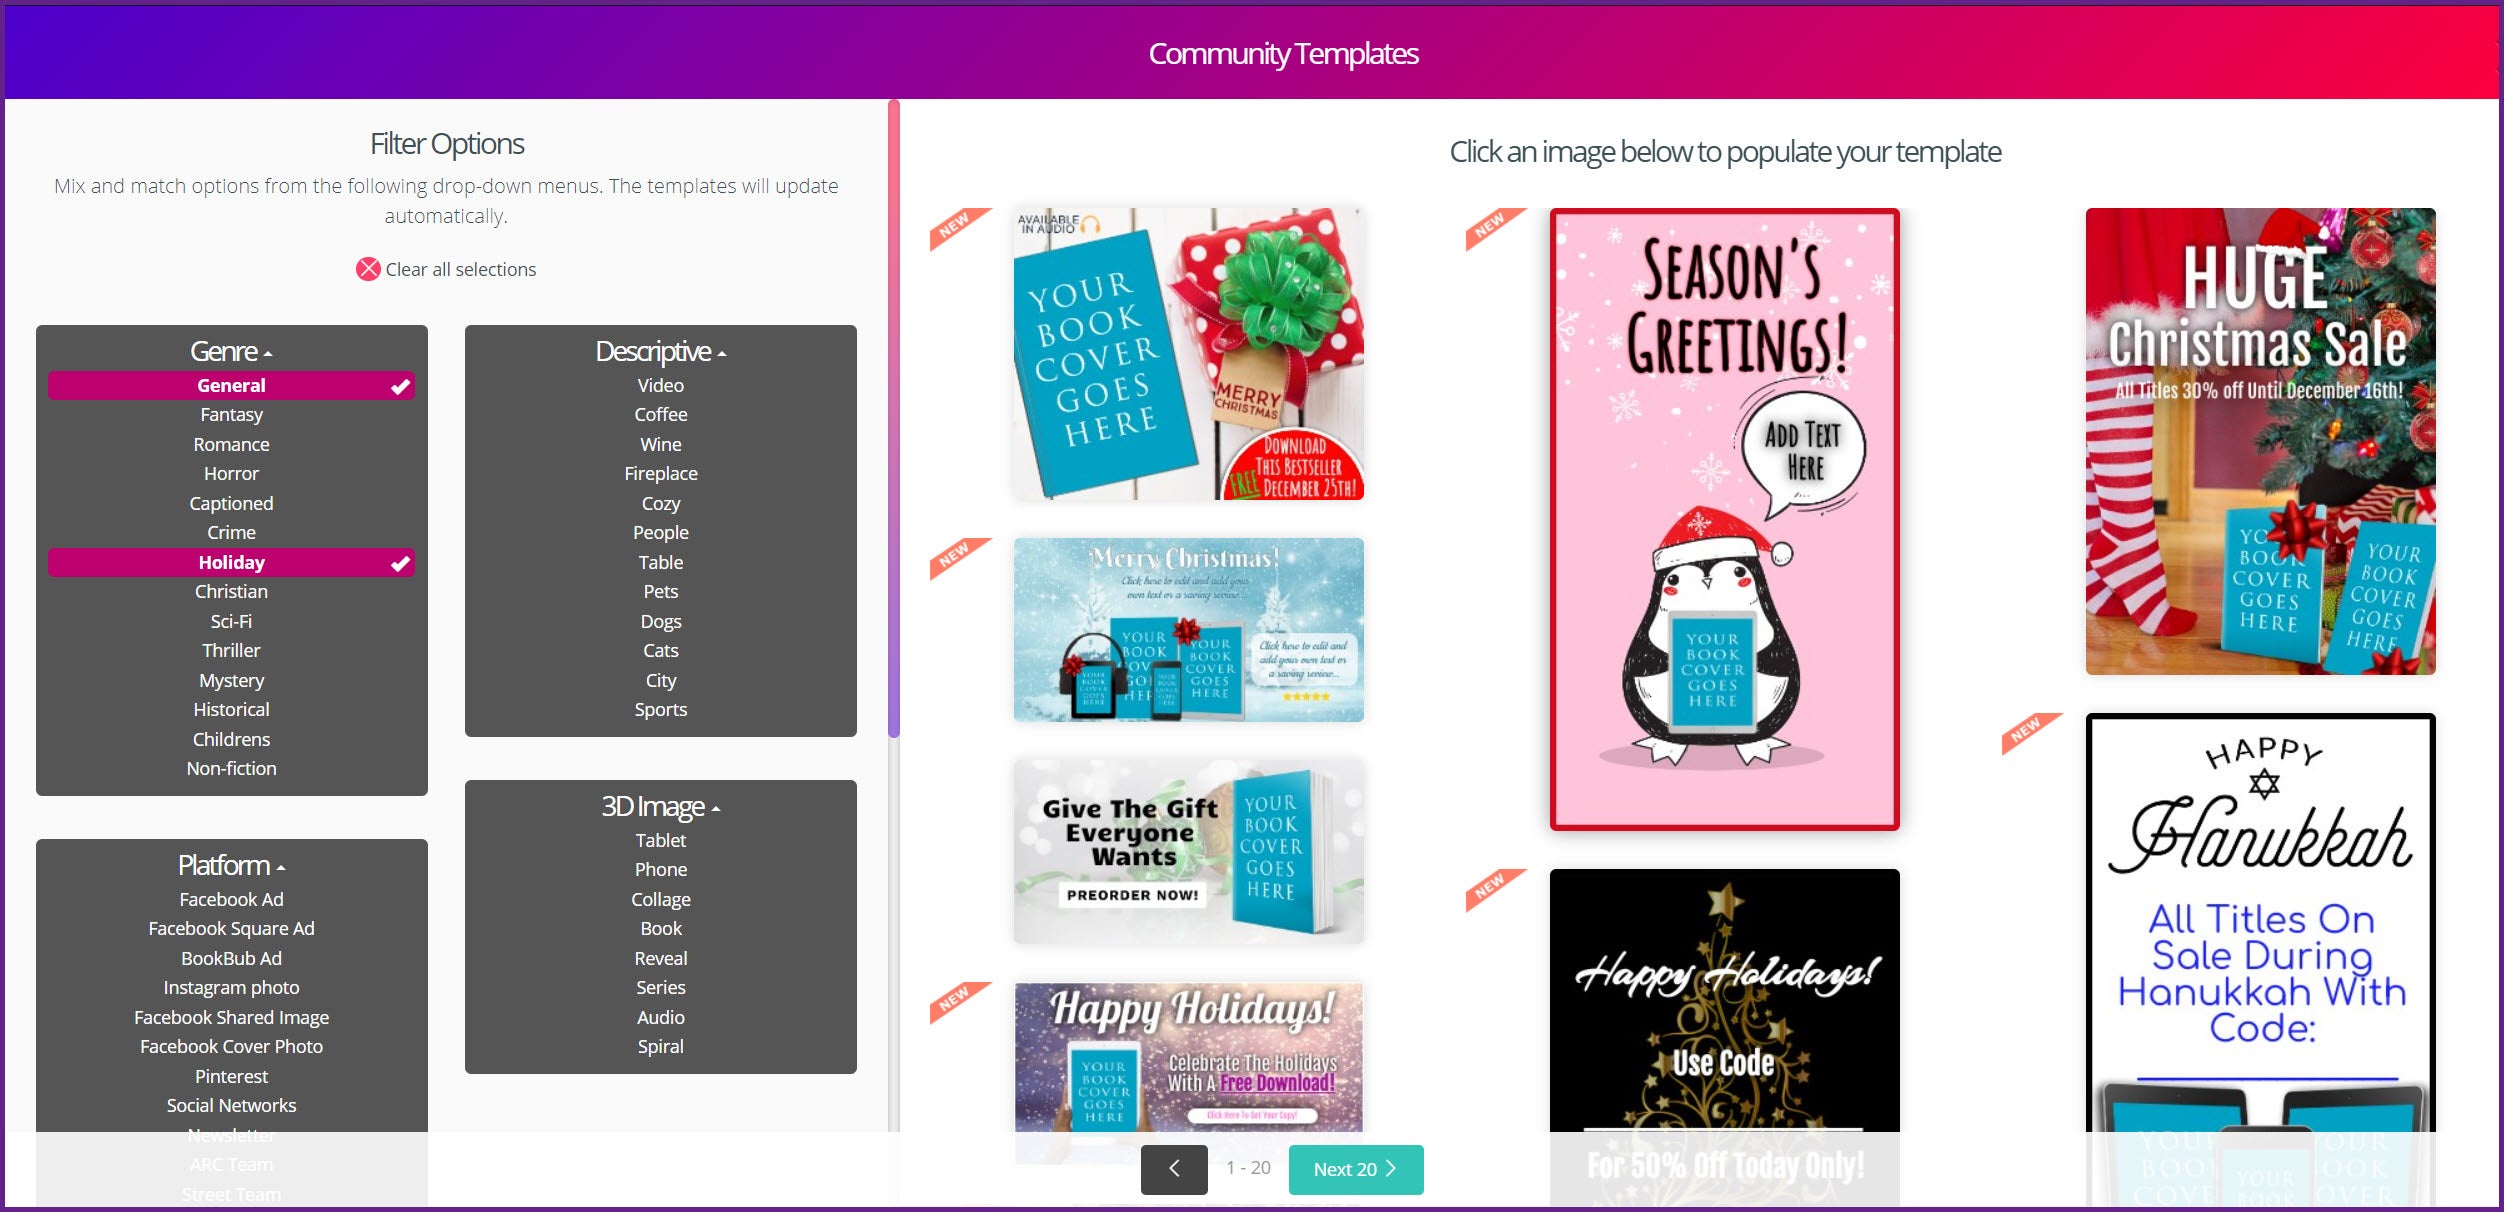
Templates is also the place you can find 1250 Community Templates that you can edit to make yours by placing your book into the “smart object” already provided and changing other elements as desired. FAST! Just use the various Filter Options to help zero in on your template needs.
click image to enlarge
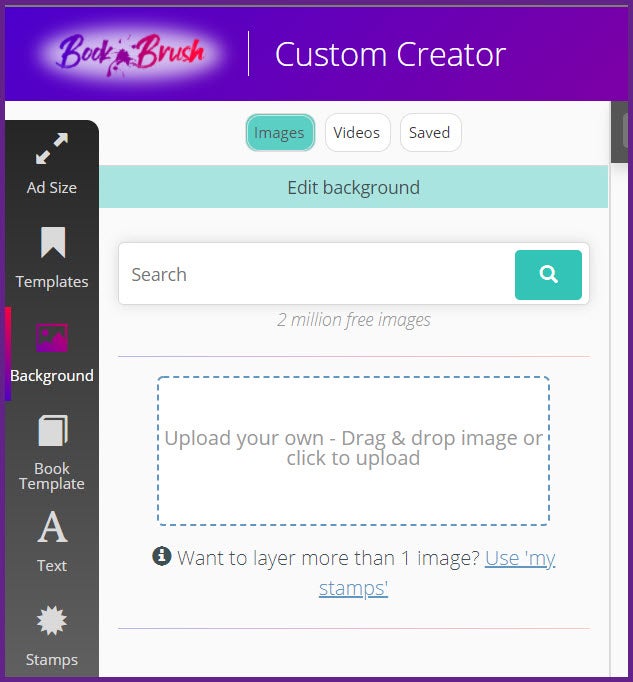
BACKGROUNDS
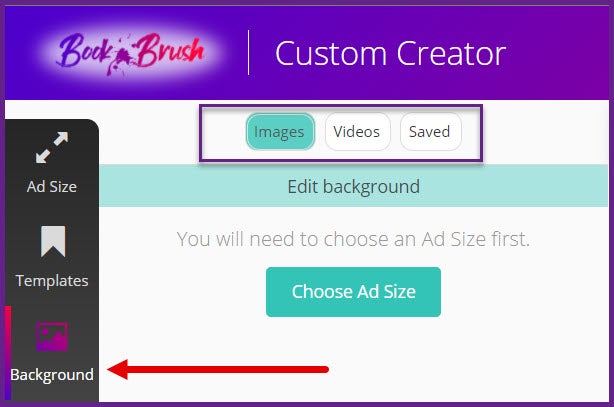
This is the first screen you’ll see when you click on Background.
Go up and choose your ad size if you haven’t already.
- I also highlighted where in backgrounds you can find images, video backgrounds and the backgrounds you’ve saved
click on image to enlarge
I’ve picked my ad size (not showing you that part of the workspace) and now I get this box. This is where I can type in my search words for images or click Video and do the same thing. “Saved” also has folder options.
click on image to enlarge
And if I have photographs or a book cover (the image upload possibilities are endless) I can upload them here. Very nice.
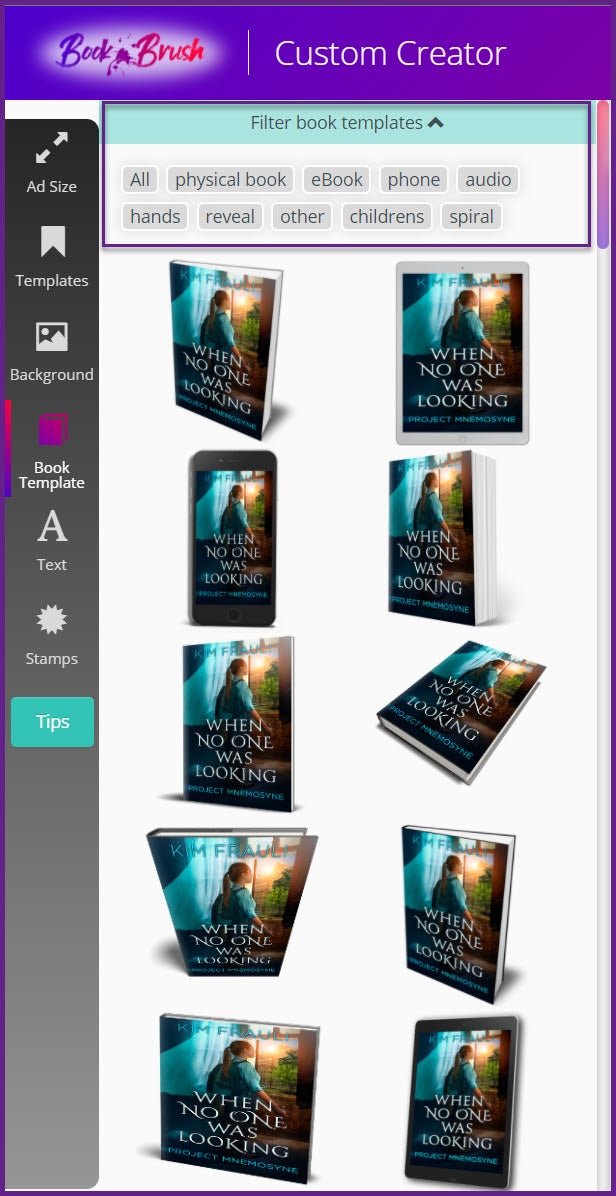
BOOK TEMPLATES
This is the place where you create 3D books out of your flat cover.
We currently have over 90 templates. You can filter them, but know we have tech equipment like phones and tablets, paper and hard back cover looks (but no spines, as the books face forward) those incredible cover reveal covers, children’s book covers, audio covers, it’s really fun to look at all of them.
I think this is really where Book Brush shines. We’re an author centric designing platform and this helpful tool makes you stand out when you create your memes.
click on image to enlarge
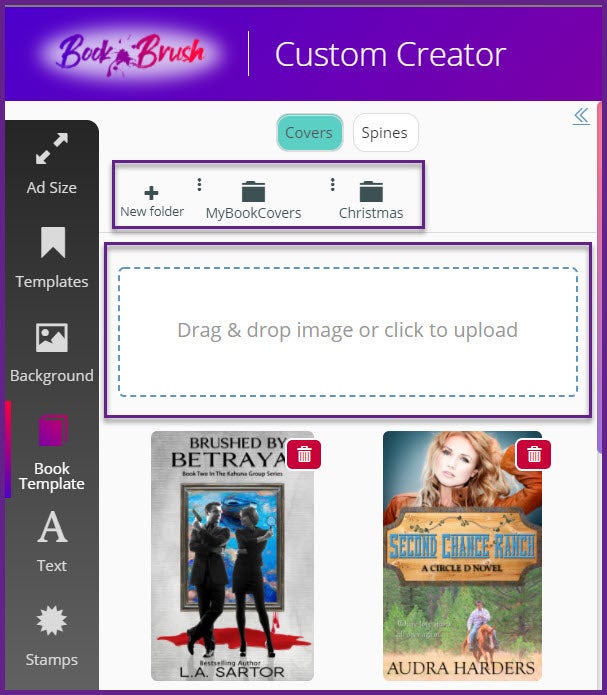
If you haven’t yet loaded your cover you can do it here. And you can create folders to make your covers easier to find.
click on image to enlarge
TEXT
This tool will add a text box. Repeat to add additional boxes.
click on image to enlarge
STAMPS
Stamps are simply another word for images you can layer on top of your background.
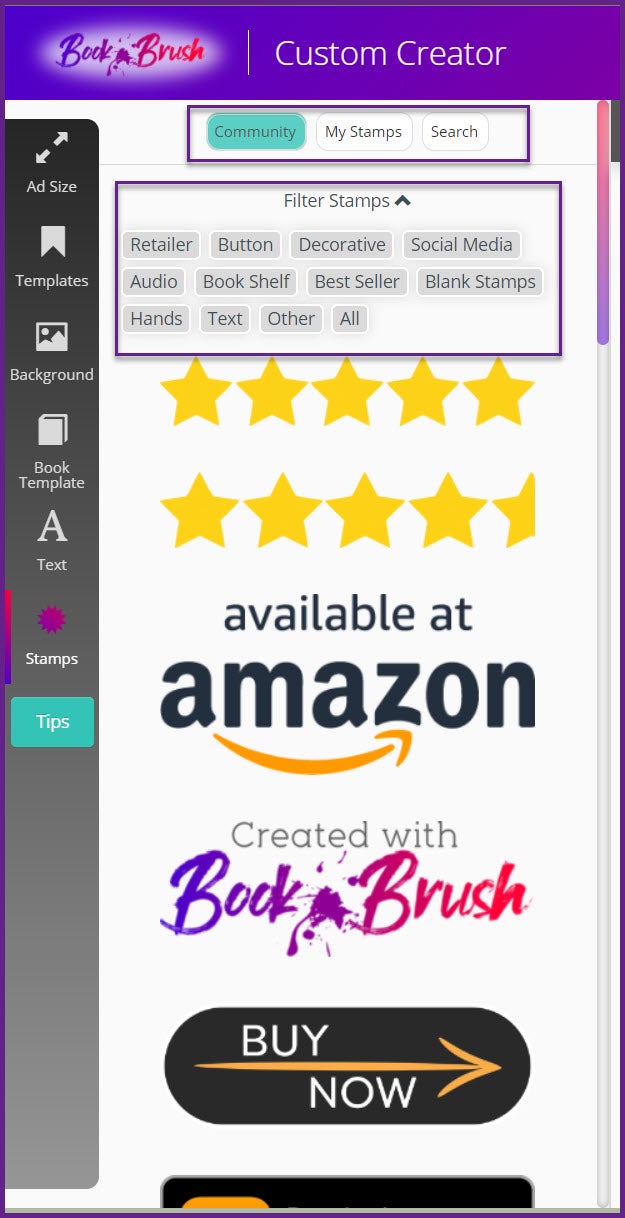
click on image to enlarge
You have Book Brush’s Community Stamps with over 1000 to choose from!!
My Stamps is where you can add your own images just the same way is in 3D creator for your book covers, with the add box.
Search is where you can sort by your need, for instance “bow”. You can search for stamps by color, style, idea.
Stamps give you an amazing and quick way to add multiple layers to your memes and covers.
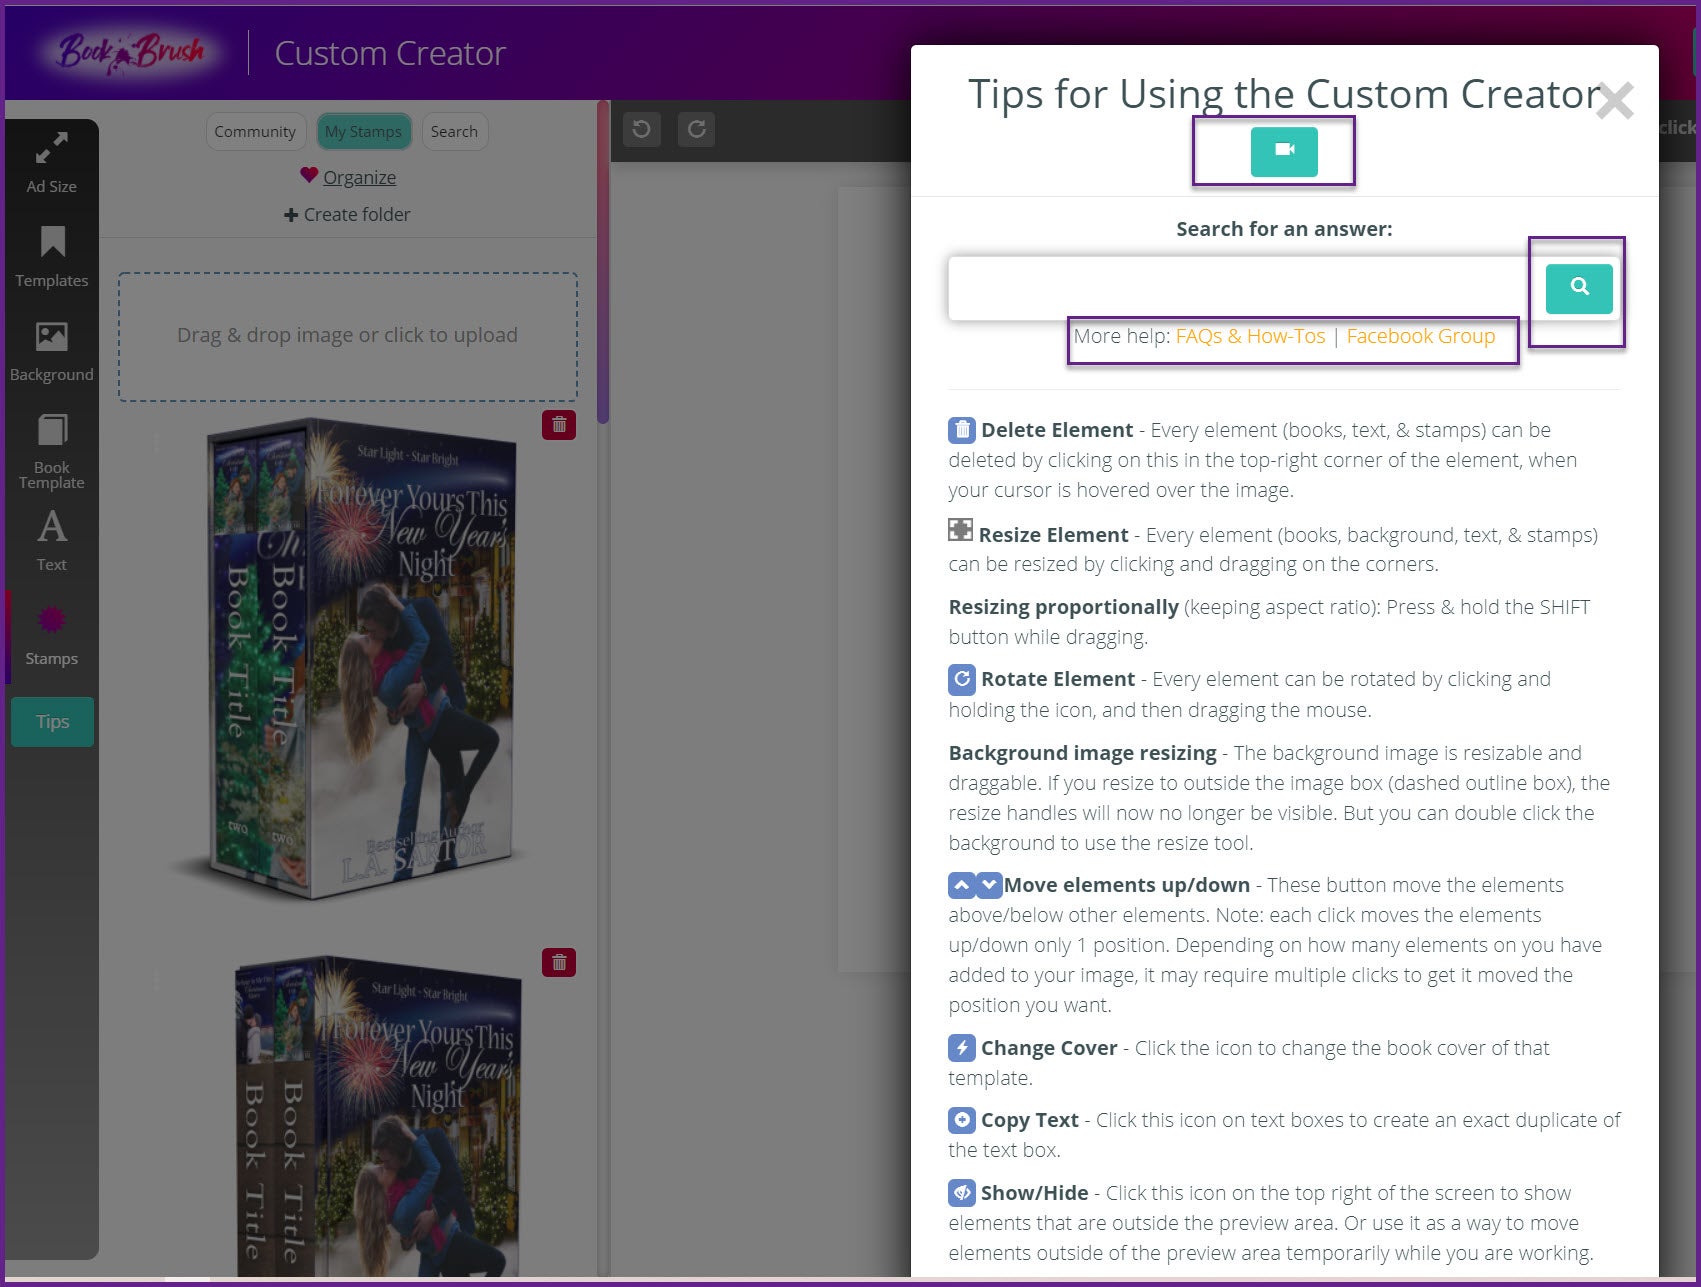
TIPS
At any time during your creative process, you can click on Tips and have a box open with help items. So, if you get stuck, you can use this.
Also below the search box is an FAQ clickable that will take you to our entire list of Frequently Asked Questions in a NEW browser window, so you don’t lose your work. A clickable to our Facebook group is also there, taking you to Facebook in a new browser window.
Or click the Video Camera for a video overview. And lastly type in your question into the search box which will take you to our FAQ’s.
click on image to enlarge
A DEEPER EXPLANATION INTO THE EDITING OPTIONS FOR EACH TOOL
BACKGROUND EDITS
For a simple edit use the bar that comes up when you load a background. I suggest you hover each one to see what it does.
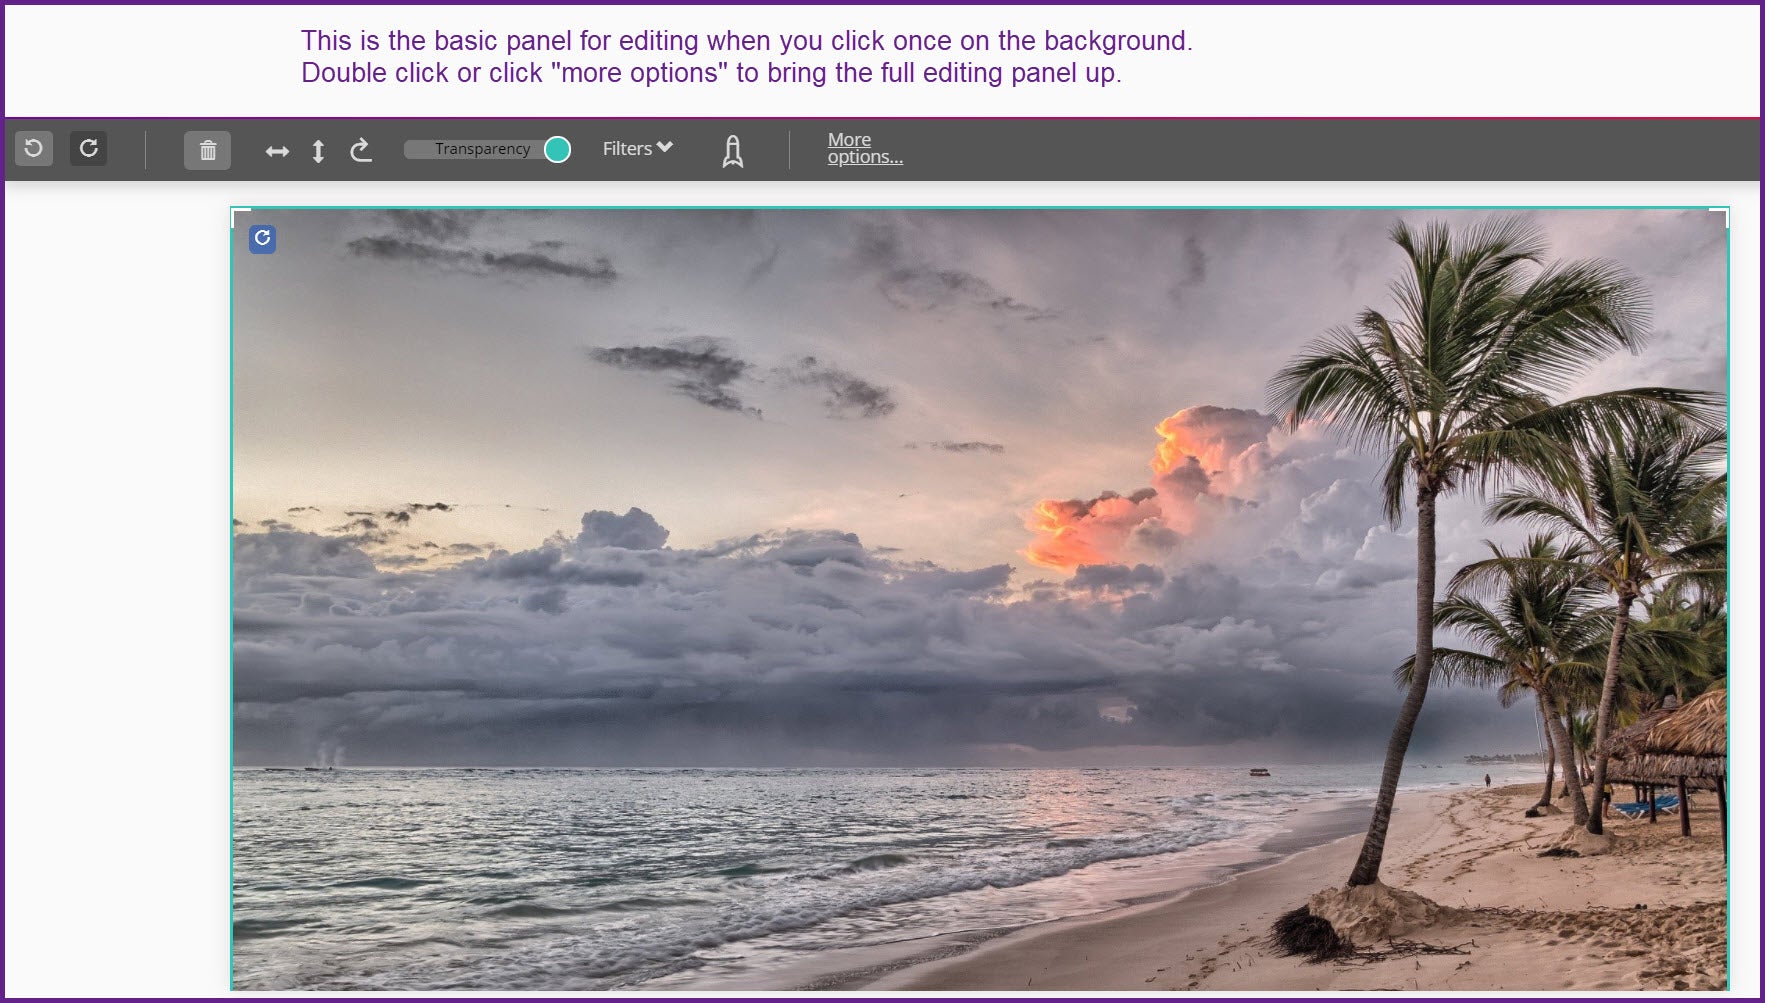
click on image to enlarge
When you double click on the image, or use the More Options button above, the full editing panel will open.
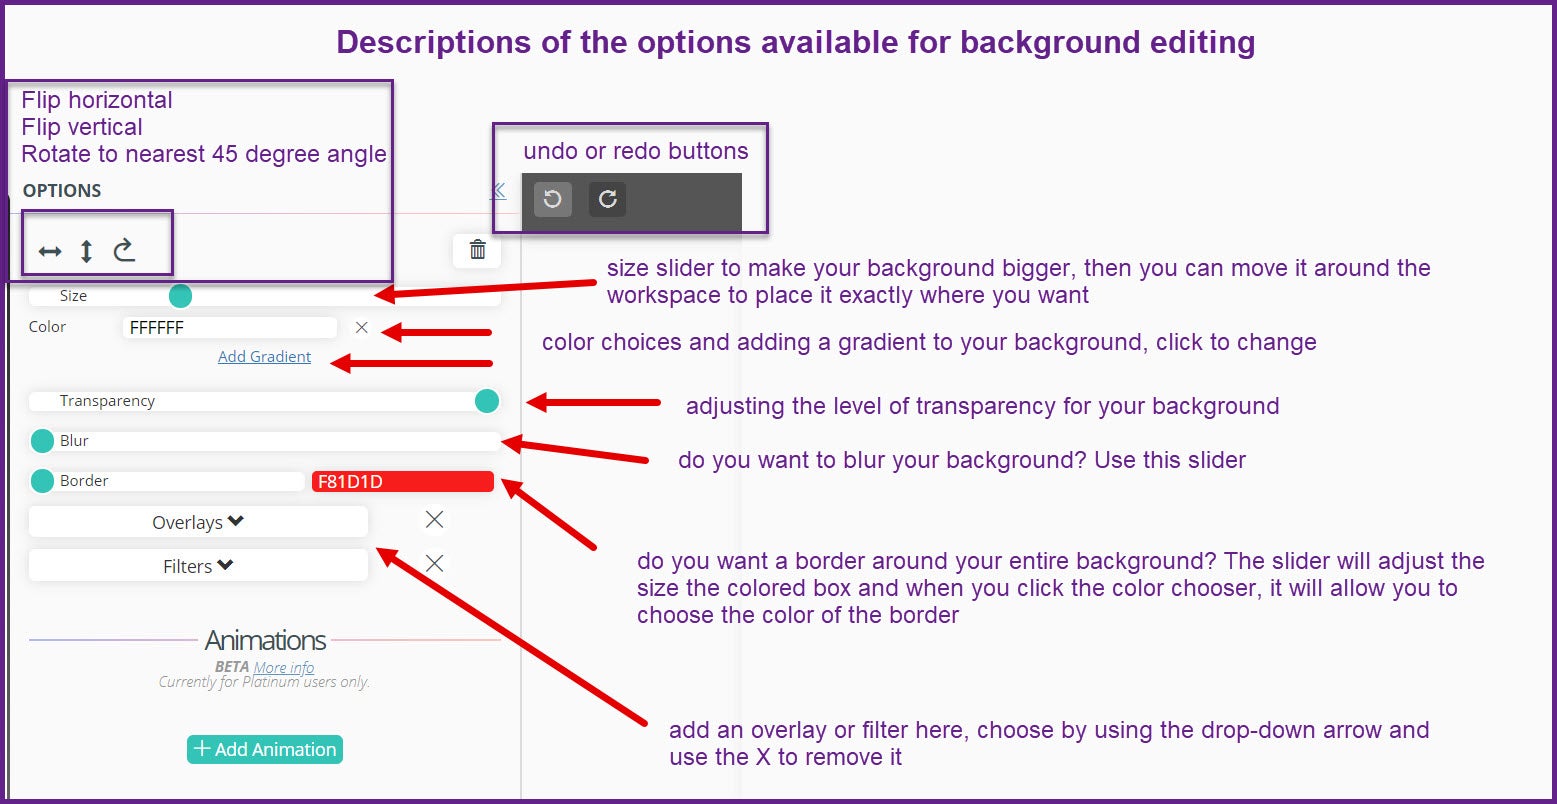
click on image to enlarge
This shows the full option editing panel for backgrounds. This is a handy reminder chart of all the editing options you can do while in the background. Refer back to this as often as you want.
click on image to enlarge
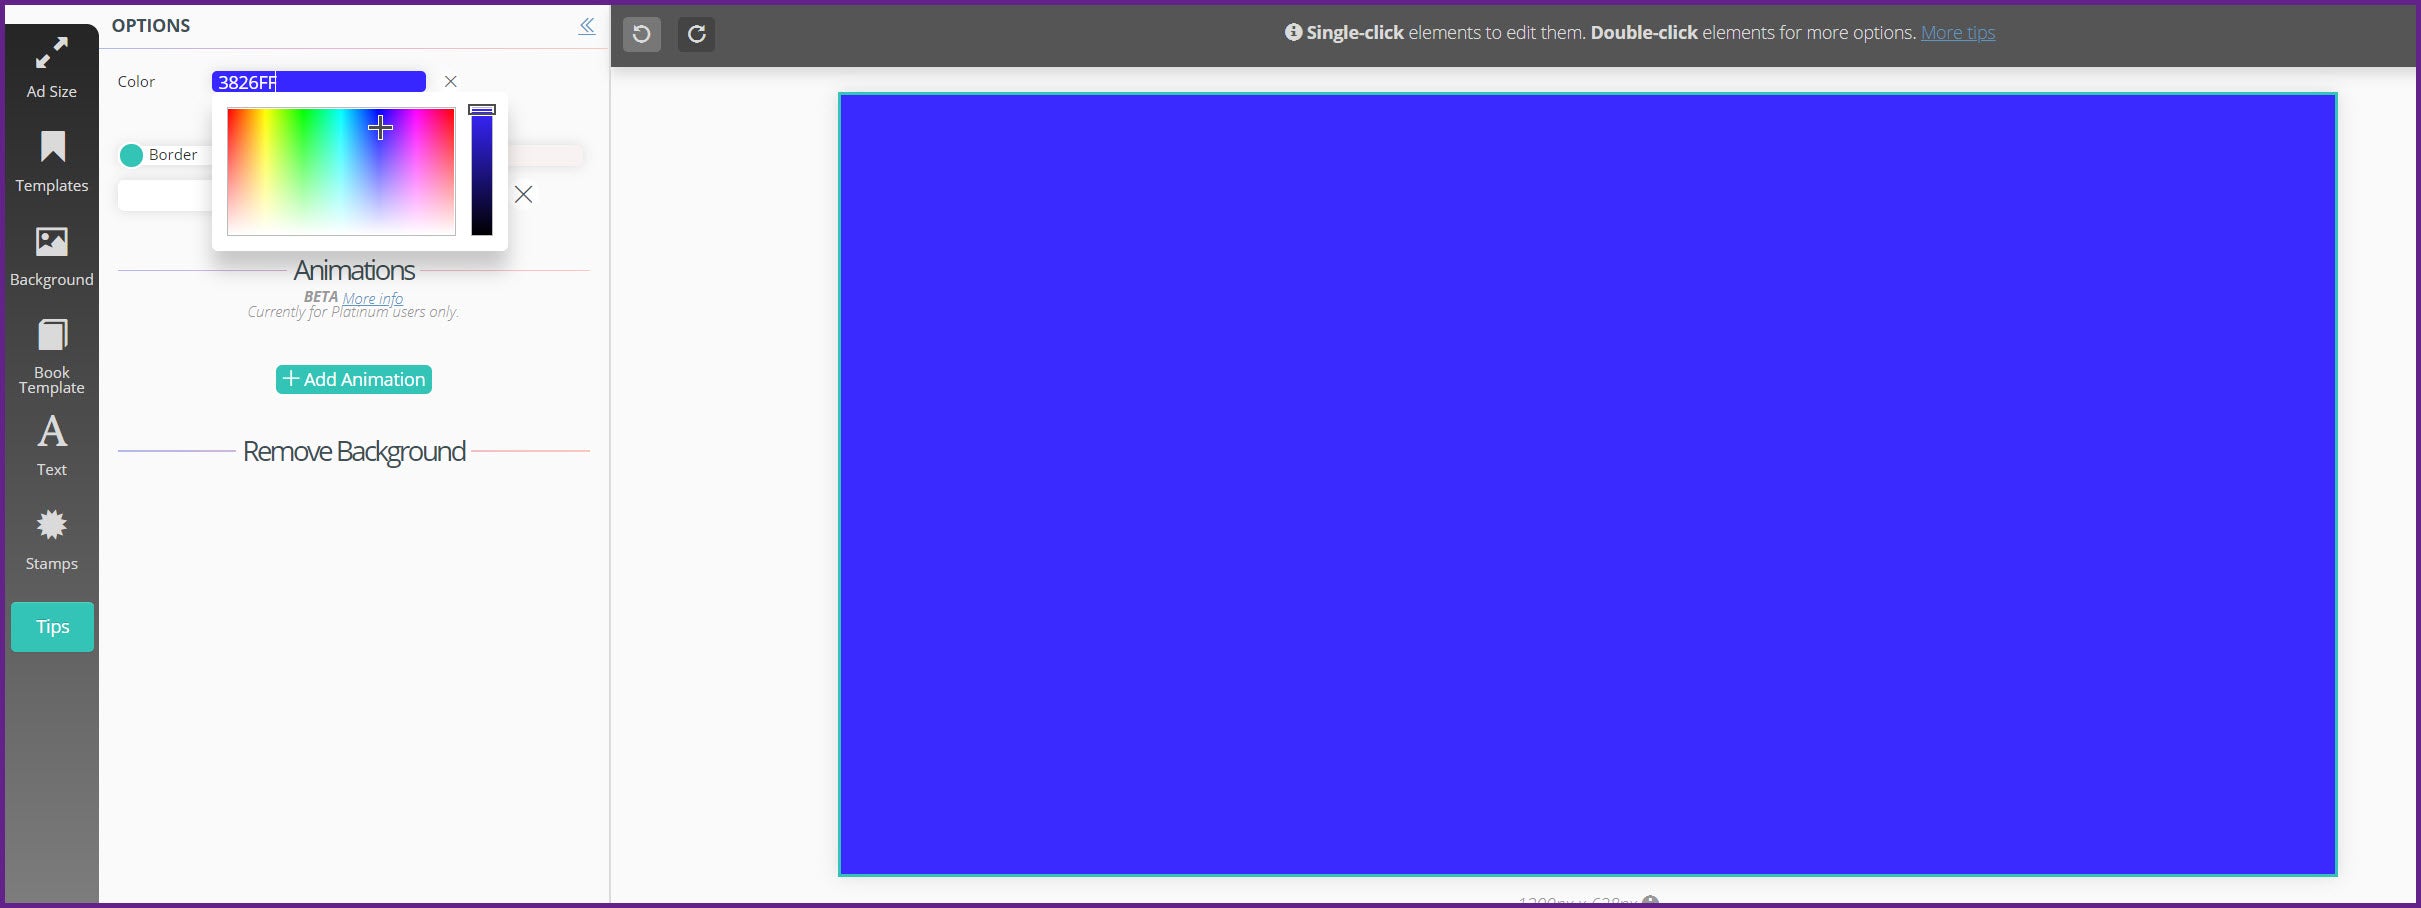
If you want a solid color background that is possible as well. Simply double click on the blank ad size and your editing box will look like this.
You can still add a border, and you’re limited to using Overlays, however those can make a huge difference in texture.
BOOK TEMPLATES
Once you’ve added your book template(s) to your workspace they can be edited as well.
Single click on your book template for simple edits.
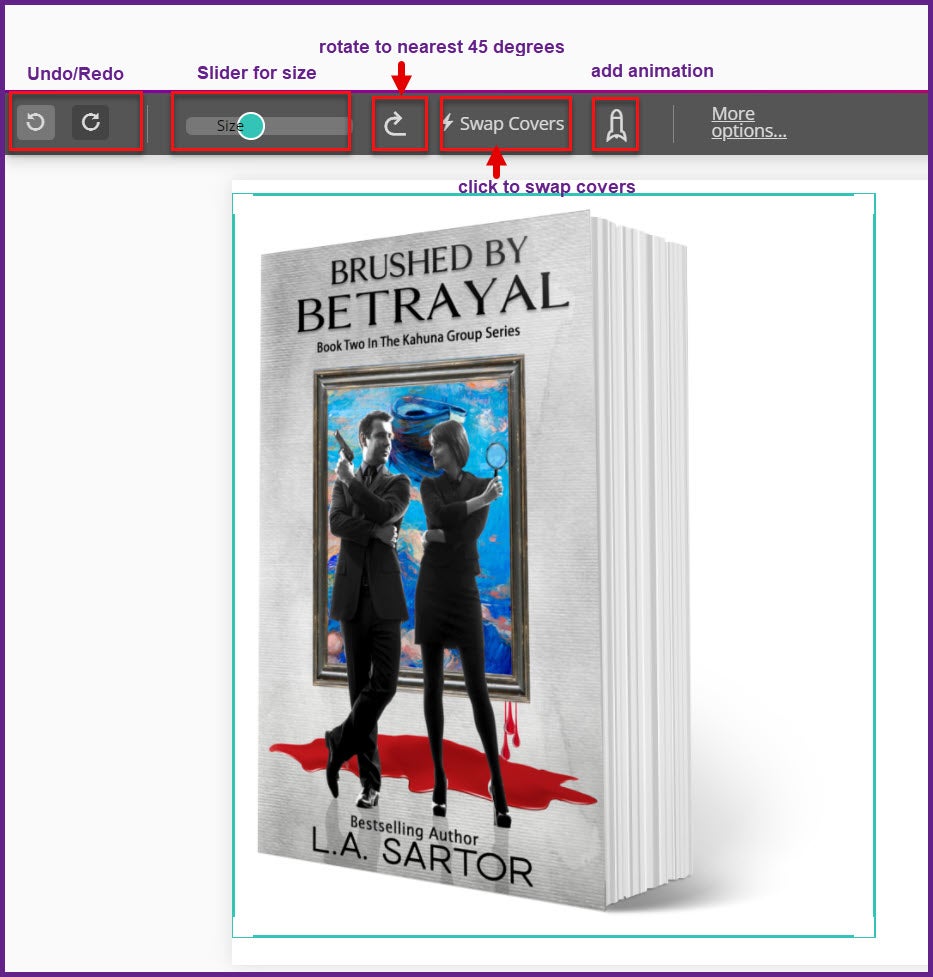
click on image to enlarge
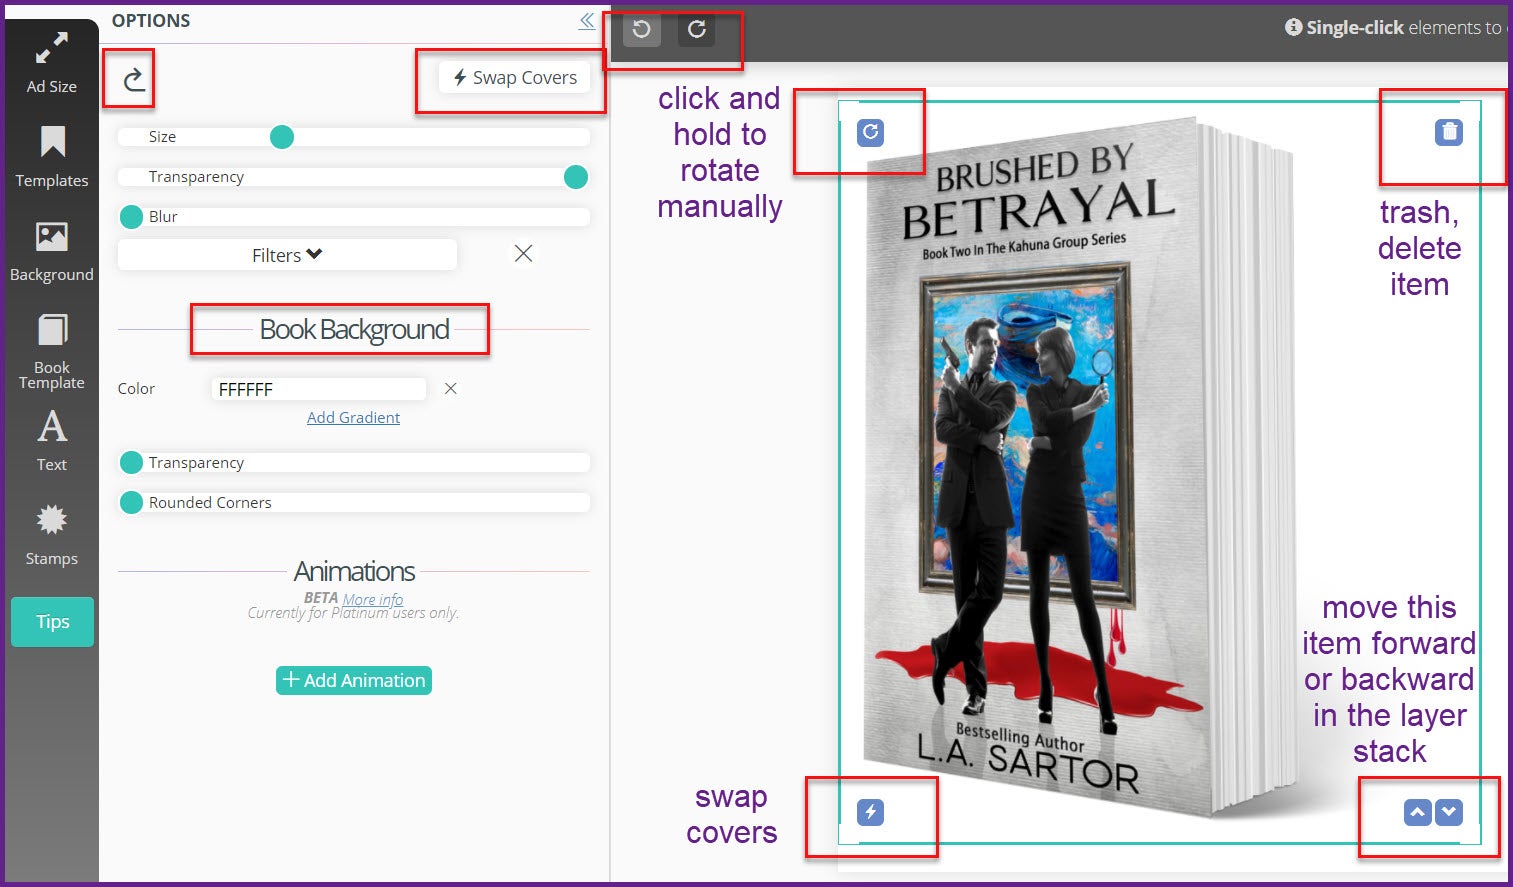
Double click (or use “More Options) to bring up the full editing panel.
Remember, the nice thing about all the editing panels is the tools behave the same way throughout Book Brush! So, the Text editing options are the same in Customer Creator is the same in Cover Creator, etc.
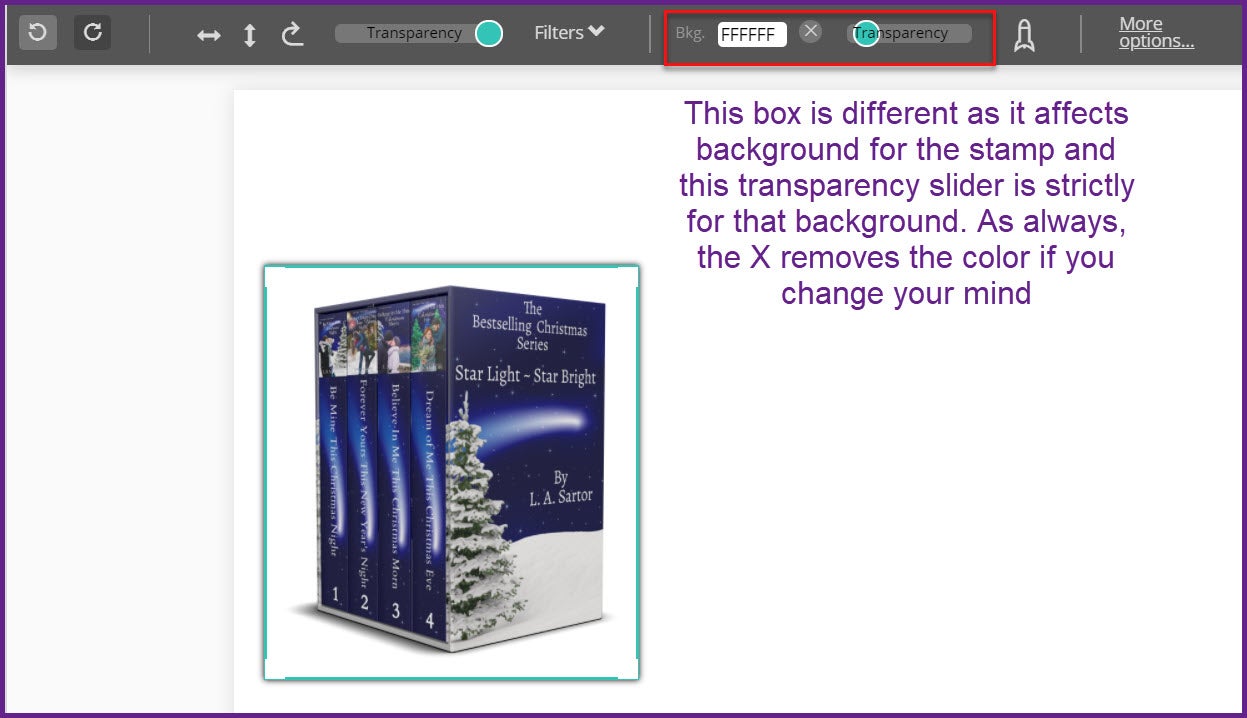
click on image to enlarge
Even though you can’t see the background in this because I have the transparency lowered all the way (see the slider), color can be added by clicking on the color block (right now it’s showing FFFFFF which is white) and choosing your desired background. Then adjust the transparency slider to your desired level of transparency. And if wanted, round the corners to give you the look you want. (I have an example of this below.)
Again, play with this, and it’ll become second nature, and allow you tons of creativity.
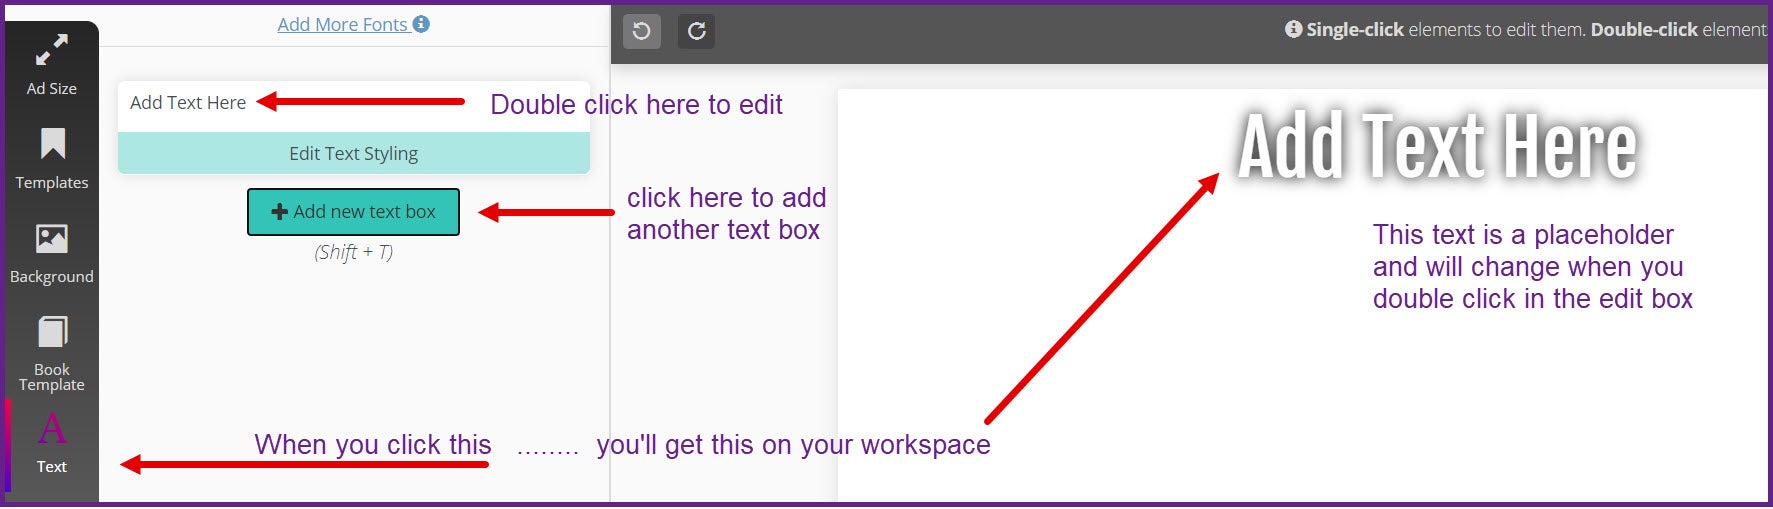
TEXT
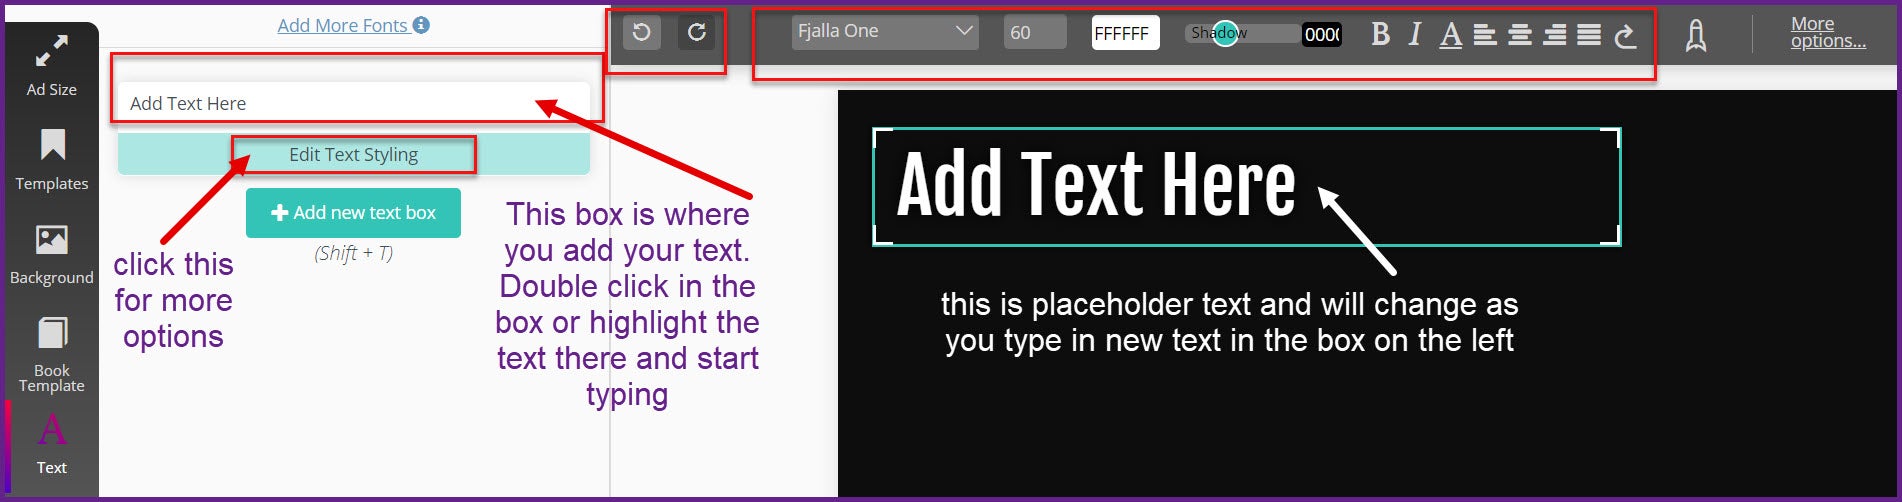
Click text to add your text box, then click once on the workspace to get this editing screen. The icons above are the traditional text editing icons.
click on image to enlarge
If you want more styling options, including adding fonts, either double click the text box on your workspace or the Edit Text Styling turquoise box.
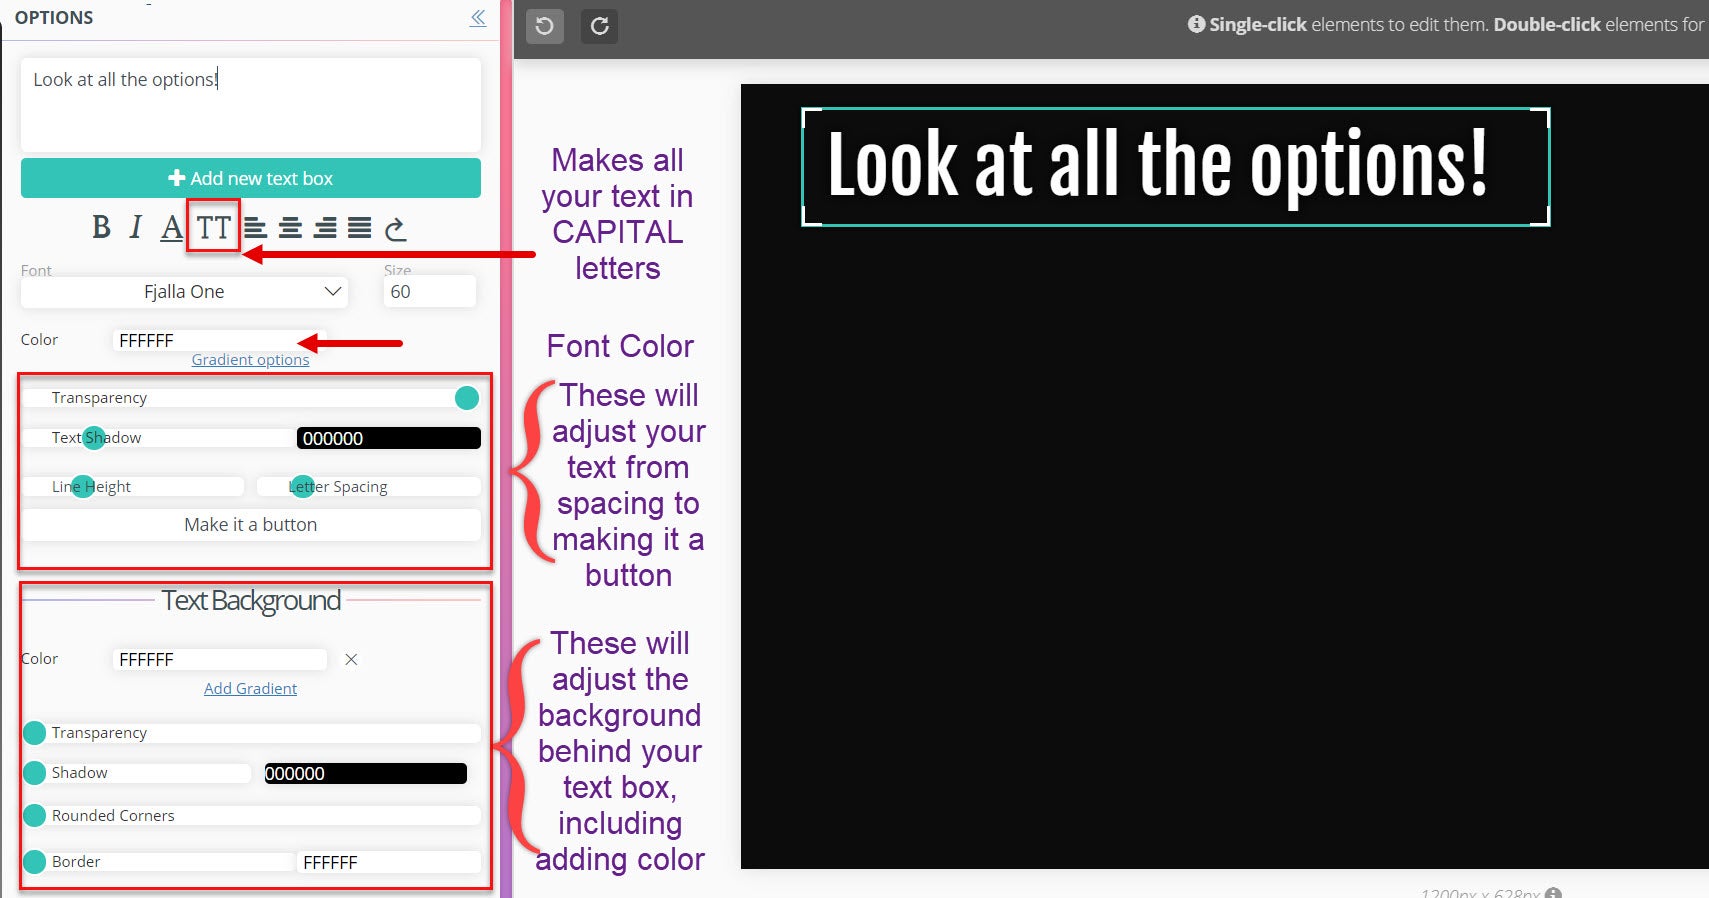
click on image to enlarge
One of the coolest things Book Brush offers us the ability to use over 1000 Google fonts. Simply click the arrow in the font box and you’ll get this menu:
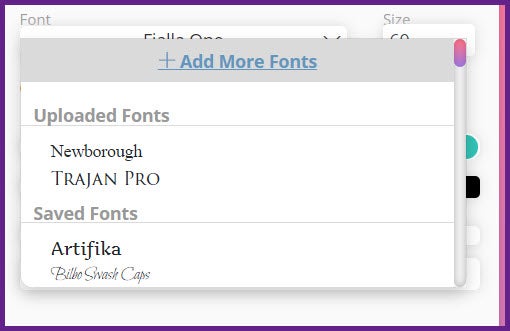
click on image to enlarge
Then click “Add More Fonts” and go to town. You can even upload font you own. Imagine matching the font in your ad with the font on your book cover!
- Hint: I would recommend purchased fonts vs free. Although free mostly works, sometimes there is a bit of wonky code that plays havoc with programs.
Please play with the various options in the text editing panel as you’ll get to know it so much better and playing is always fun.
STAMPS
Remember up above when I said stamps was really another way of adding layers to your workspace? They are also editable.
click on image to enlarge
By now it should be second nature to double click if you want the expanded editing options. The upper panel hopefully feels familiar to you.
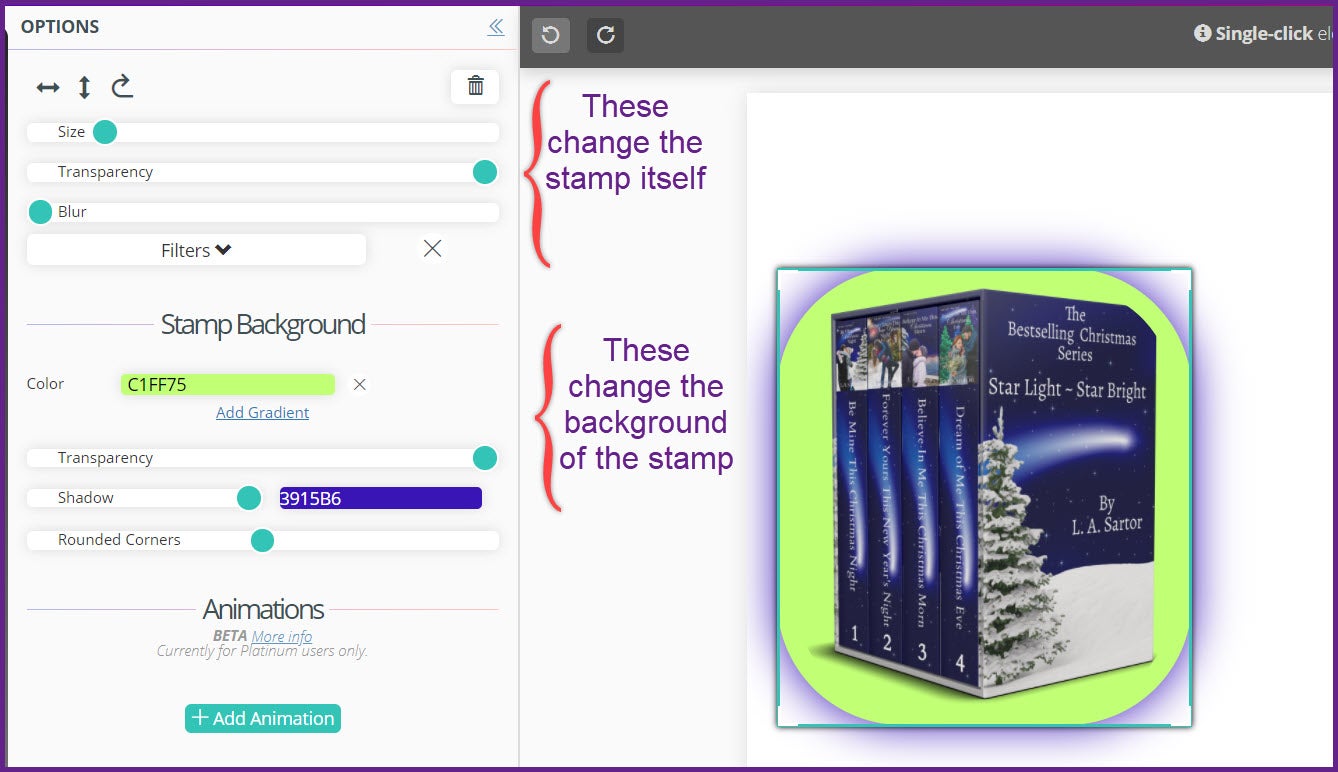
click on image to enlarge
You may hate the colors I chose for the background on this example, but I wanted to you to really see the difference if you change the background of the stamp.
Here it is without the “selection” box around it.
click on image to enlarge
And remember I said you can add to your Instant Mockups by making the IM’s a stamp?

click on image to enlarge
I’m hoping this “tour” of Book Brush’s Custom Creator has given you a better feel for the tools inside this amazing Creator and how you can edit with these tools to make everything you create uniquely yours.
If you want to learn more about Custom Creator and watch it in action, please register for our webinars https://bookbrush.com/book-brush-demos/
 Article by L.A. Sartor
I started writing as a child, really. A few things happened on the way to becoming a published author … specifically, a junior high school teacher who told me I couldn’t write because I didn’t want to study … urk … grammar… That English teacher stopped my writing for years.
But the muse couldn’t be denied, and eventually I wrote, a lot. I learned a litany of new things and published my first novel. My second book became a bestseller, and I’m absolutely on the right course in my life.
Please come visit me at www.lasartor.com, see my books, find my social media links, and sign up for my mailing list. I have a gift I’ve specifically created for my new email subscribers.